You can use a Terminal Server to perform many tasks. Users on the remote locations can run programs, save files and use network resources with the help of Terminal Server. If you install any program on the Terminal Server, then it is certain that all the users will utilize the same version of the installed program. If you configure a computer as a Terminal Server, then from this computer multiple users can access a program at the same time.
You do not have to install Terminal Server, in case you want to use this computer for remote administration on Windows Server 2003 operating systems. In this case, you can use Remote Desktop for Administration. Remote Desktop for Administration will provide you the facility to manage the servers remotely from any client over a LAN, WAN, or dial-up connection. This will happen after you enable the remote connections.
If you are completed the Configure Your Server Wizard, then you have to perform the following steps. You have to confirm about your Internet Explorer Enhanced Security Configuration settings. After this, you have to configure a Terminal Server License Server. You can install both the Terminal Server and Terminal Server Licensing service on the same physical computer, in case of small deployments. It is required that you should install Terminal Server Licensing on a separate computer, in case of large deployments. You have to install client access licenses (CALs) on the Terminal Server License Server.
It is required that you should configure Terminal Server Licensing correctly, so that your terminal server can continue to accept connections from the clients. Terminal Server Support offers a licensing grace period, during which no license server is needed. In this grace period, a terminal server can accept connections from unlicensed clients without contacting a license server. After you have completed both the Configure Your Server Wizard and these additional needed tasks, you will get a basic terminal server.
Friday, January 8, 2010

Wednesday, December 30, 2009
Connection of Clients to Terminal Services
This article will throw some light on how to connect a Windows Server 2003 based terminal services client to a terminal server by using Remote Desktop Connection.
For connecting clients to terminal services, you have to open Remote Desktop Connection. For doing this, click Start, select All Programs, click on Accessories. Then click on Communications and then click Remote Desktop Connection. After opening the Remote Desktop Connection, you have to create a terminal services connection. Follow these steps for doing this: Open Remote Desktop Connection on your Windows server. Then in the Computer box, type the computer name or the IP address of a terminal server or a computer that has Remote Desktop enabled. If you want to get connected to a remote computer from a console session, then type computer name or IP address /console. Then click on Connect. After that you will view a Windows dialog box. In this dialog box, type your user name, password and domain and then click OK.
After the creation of terminal services connection, you have to save this as a Remote Desktop protocol (.rdp) file. This .rdp file consists of all the information for connecting to a terminal server. This file also contains the optional settings that were performed at the time of saving this file. Follow these steps for saving your connection settings:
- You have to open Remote Desktop Connection and then click on Options.
- Then you have to determine the connection settings that you would like for this connection.
- After that on the General tab, click Save As. In the File name box, type a file name for the saved connection file and then click on Save.
- After saving the connection settings, you can also open any saved connection.
- You have to open Remote Desktop Connection and then click on Open.
- Then double-click the .rdp file for that connection which you want to open.
These are steps to connect clients to Terminal Services. For Terminal Server Support and related updates subscribe to our blog.
Friday, December 18, 2009
Windows Server 2008
Windows Server 2008 is a Windows server line of operating systems developed by the Microsoft. It was launched on February 27, 2008 and the successor of Windows Server 2003 which was launched nearly five years before. Its updated version, Windows Server 2008 R2, was launched on July 22, 2009. It is constructed on Windows NT 6.x as similar with Windows Vista and Windows 7.
It is developed from the similar code base like Windows Vista. So, because of code similarity, it automatically supports most of the technical, security, management and administrative features which are new to Windows Vista like the enhanced image-based installation, deployment and recovery and many more.
Windows Server 2008 comprises of a fluctuation of installation known as Server Core. In this all of the sustainment work is performed with the command line interface windows. Alternatively, this work can be performed by linking the machine remotely with the help of Microsoft Management Console.
It provides high-availability of services and applications with the Failover Clustering. In the Windows Server 2008 and 2008 R2, the manner in which the clusters are specified, is altering significantly with the insertion of the cluster validation wizard. The cluster validation wizard is a feature that is incorporated with the failover clustering in Windows Server 2008 and 2008 R2. If you want to execute a set of focused tests on a collection of servers, that you specify to use as nodes in a cluster, then you can perform this with the help of cluster validation wizard.
Wednesday, December 16, 2009
Alteration in Terminal Server's Listening Port

As I have described earlier about Application Server Security that is securing your Terminal Servers now will describe how to alter listening port of your Server.
It is a well-known fact that TCP port 3389 is used by Terminal Server and Windows 2000 Terminal Services for client connections. Alteration in this port is not recommended by Microsoft. But you can change this port. You have to perform this task carefully, otherwise you will face serious problems.
- You have to give more concentration while modifying the registry. If you want to change the default port, then you have to follow these steps:
- You start with the task of running Regedt32 and go to this key, HKEY_LOCAL_MACHINE\System\CurrentControlSet\Control\Terminal Server\WinStations\RDP-Tcp.
- Then you have to find the port number subkey and notice the value of 00000D3D, hex is for 3389.
- After this, you have to change the port number in Hex and save the new value
If you want to change the port for a particular connection on the Terminal Server, then follow these steps:
- You have to run Regedt32 and go to this key, HKEY_LOCAL_MACHINE\System\CurrentControlSet\Control\Terminal Server\WinStations\connection.
- After this, you have to find the port number subkey and notice the value of 00000D3D, here hex is for 3389.
- Then you have to change the port number in Hex and save this new value.
- After performing this, you have to make alteration in the Port on the Client Side.
Follow these steps to perform this:
- You have to open Client Connection Manager.
- Then on the File menu, click on New Connection and then create the new connection. After executing the wizard, you will view a new connection listed there.
- Then you have to ensure that new connection is highlighted. After this, on the File menu, click Export.
- Then you have to edit the .cns file using Notepad. You have to make modifications in the server port, Server Port=3389 to Server Port= new port number, that you had specified on Terminal Server.
- Now import the file back into Client Connection Manager. Then you will be demanded to overwrite the current one.
- If it has the same name, then overwrite it.
In this way, you will receive a client that has the correct port settings to match your Terminal Server settings. Hope it will help you out, Don’t Forget to subscribe to my blog for more tips and tricks on server and Microsoft Server Support Services
Tuesday, September 22, 2009
Why Reliable Web Hosting is Essential?
For those individuals who have web hosting needs where security and uptime are paramount, the world is a very happy place. Most webhosts can offer uptime guarantees which are above 99%. This figure is enough to make any business owner smile. It does not, however, mean that all of those webhosts that offer this figure are equally reliable. There are other factors involved in webhosting which may not frequently manifest as advantages or disadvantages but, when they do come into play, can make the difference between suffering and surviving an absolute disaster.
Webhosts generally operate out of what's called a "server farm". If one were to visit one of these facilities, they would find racks upon racks of servers humming away and serving up their client's web pages. These farms have certain requirements to ensure that they're reliable and safe. Most importantly, they need to be protected from human and environmental security threats that could compromise the well-being of the sites hosted on them. This is not a simple endeavor and any reputable webhosting company will be more than happy to answer any questions related to their facility. If they're not willing to offer straight answers about their facility, look elsewhere.
A server farm should have a backup system that allows it to keep functioning in the event of a local power outage. This is a basic question to ask of any webhost. It should also be insulated from other environmental threats such as floods, hurricanes and tornadoes. This is a basic measure for any company which does most of its business online. If the site goes down, the business goes down and customers on the Internet are notoriously unforgiving of downtime. To avoid downtime, there is a technology called "fail-over" which means that, essentially, if one's primary server should fail that another will take up the work. Ask about this feature.
Be sure to ask about server security where one's users are concerned. Any webhosting company should be willing to provide a secure server-called an SSL connection-to any one of their clients. This is needed for any exchange of personal data or financial information. Make certain that one's webhost not only supports the sale and installation of this feature but that their technical support can help clients setup and maintain this technology if need be. Oftentimes, solid reliability in a webhost means skilled technical support!
Webhosts generally operate out of what's called a "server farm". If one were to visit one of these facilities, they would find racks upon racks of servers humming away and serving up their client's web pages. These farms have certain requirements to ensure that they're reliable and safe. Most importantly, they need to be protected from human and environmental security threats that could compromise the well-being of the sites hosted on them. This is not a simple endeavor and any reputable webhosting company will be more than happy to answer any questions related to their facility. If they're not willing to offer straight answers about their facility, look elsewhere.
A server farm should have a backup system that allows it to keep functioning in the event of a local power outage. This is a basic question to ask of any webhost. It should also be insulated from other environmental threats such as floods, hurricanes and tornadoes. This is a basic measure for any company which does most of its business online. If the site goes down, the business goes down and customers on the Internet are notoriously unforgiving of downtime. To avoid downtime, there is a technology called "fail-over" which means that, essentially, if one's primary server should fail that another will take up the work. Ask about this feature.
Be sure to ask about server security where one's users are concerned. Any webhosting company should be willing to provide a secure server-called an SSL connection-to any one of their clients. This is needed for any exchange of personal data or financial information. Make certain that one's webhost not only supports the sale and installation of this feature but that their technical support can help clients setup and maintain this technology if need be. Oftentimes, solid reliability in a webhost means skilled technical support!
Friday, August 28, 2009
How To Protect Your PC
In the current scenario where computer security issues have come front-and-center for small businesses of all types. And for good reason. Your company's computers contain valuable, irreplaceable data that make them a target for hackers, data thieves and others up to no good.
Keeping your computers and their contents safe and secure is crucial to continued business growth, as well as your personal sanity. A breach in security could be disastrous for you and your company.
Security slips can cause of :
If you do the following following activity, then there is fair chances that your system would be free from virus, spyware or malicious stuffs:
Take Computer Security Seriously
Every business, no matter how small, has computer security needs. If you're operating a network, using email, conducting business through a Web site, using wireless equipment or planning to grow, your security needs can be wide ranging and complex, even for a one-person operation.
Connect with Security Product Vendors Online
A wide range of vendors supply computer security products and services designed specifically for small business.
Get a Firewall
A firewall is a program or hardware device that filters information coming through the Internet to your computer or network. If the firewall detects information that could be destructive to your computers or network, it blocks it. Most small business owners can get by with a software firewall or a firewall that's included in a router (a router is what connects several computers to one modem).
Prevent Viruses
Viruses can clutter your email inbox with virus emails, make your computer run slower than usual and in worst-case scenarios, erase your hard drive.
Keeping your computers and their contents safe and secure is crucial to continued business growth, as well as your personal sanity. A breach in security could be disastrous for you and your company.
Security slips can cause of :
- Lose precious data
- Leak company or trade secrets
- Disclose sensitive customer information
- Unleash viruses on your computers
- Lead to unproductive downtime
- Require time and money to correct
If you do the following following activity, then there is fair chances that your system would be free from virus, spyware or malicious stuffs:
Take Computer Security Seriously
Every business, no matter how small, has computer security needs. If you're operating a network, using email, conducting business through a Web site, using wireless equipment or planning to grow, your security needs can be wide ranging and complex, even for a one-person operation.
Connect with Security Product Vendors Online
A wide range of vendors supply computer security products and services designed specifically for small business.
Get a Firewall
A firewall is a program or hardware device that filters information coming through the Internet to your computer or network. If the firewall detects information that could be destructive to your computers or network, it blocks it. Most small business owners can get by with a software firewall or a firewall that's included in a router (a router is what connects several computers to one modem).
Prevent Viruses
Viruses can clutter your email inbox with virus emails, make your computer run slower than usual and in worst-case scenarios, erase your hard drive.
Monday, August 17, 2009
Install A Firewall [APF] : Secure Your Server
If you are concern about server security or your system. Then you mush have to install a firewall(APF) on your system. Now just follow me to how to install or configure it;
Still you are concern about more security, then we are 24/7 with you for all type of server secirity solutions and services.
So please call us at : 1-866-914-9838 or just login at: http://www.iyogibusiness.com
- To install APF SSH into server and login as root.
- At command prompt type: cd /root/
- type: wget http://www.rfxnetworks.com/downloads/apf-current.tar.gz
- type: tar -xvzf apf-current.tar.gz
- type: rm -f apf-current.tar.gz
- type: cd apf-0.9.4-6
- type: sh ./install.sh
- After APF has been installed, you need to edit the configuration file.
At command prompt type: cd /etc/apf
Then type pico -w conf.apf - Scroll down and find
USE_DS="0"
change it to
USE_DS="1" - Now scroll down and configure the Ports. The following ports are required for CPanel Servers for example - this may not be exactly what you need, but you can change the list to what you do need.
Common ingress (inbound) TCP ports
IG_TCP_CPORTS="21,22,25,53,80,110,143,465,953,993,995,2082,2083,2084,2086,2087,2095,2096,3306,6666,7786,3000_3500"
Common ingress (inbound) UDP ports
IG_UDP_CPORTS="53,6277"
Common ICMP (inbound) types
IG_ICMP_TYPES="3,5,11,0,30,8"
Common egress (outbound) TCP ports
EG_TCP_CPORTS="21,25,37,53,80,110,113,#123,443,43,873,953,2089,2703,3306"
Common egress (outbound) UDP ports
EG_UDP_CPORTS="20,21,53,873,953,6277"
Common ICMP (outbound) types
EG_ICMP_TYPES="all"
Save the changes then exit. To restart APF type: /usr/local/sbin/apf -s - Open a new SSH Session to the server
After you are sure everything is working fine, change the DEV option
At command prompt type: cd /etc/apf
At command prompt type: pico -w conf.apf
Scroll down and find
DEVM="1"
change it to
DEVM="0"
Save changes, exit and then restart firewall,
At command prompt type: /usr/local/sbin/apf -r
Still you are concern about more security, then we are 24/7 with you for all type of server secirity solutions and services.
So please call us at : 1-866-914-9838 or just login at: http://www.iyogibusiness.com
Monday, June 29, 2009
How about a Microsoft Security Essentials for servers?
Desktop PCs can always be reimaged. It’s a pain, but downtime only affects one person. Servers, on the other hand, need to be up the vast majority of the time. Rebuilding servers affects lots of people, often in mission-critical ways. While most servers don’t spend much time browsing the web or receiving emails, some have quite a bit of exposure.
While every Windows server obviously needs anti-malware protection, terminal servers and others providing virtual desktops or remote access could clearly benefit from the real-time protection promised by Microsoft’s Morro project (now officially known as Microsoft Security Essentials). There are those, in fact, who see it as Microsoft’s responsibility to provide malware protection for all of its products, given their penchant for attracting malicious code.
Unfortunately, MSE is only available for Windows XP, Vista, and 7. No mention of servers. No Googling suggested that server support is in the pipeline. While Clamwin does a perfectly adequate job protecting servers, full-blown server anti-malware solutions aren’t cheap and, again, lack MSE’s near real-time updates.
Then again, would you entrust your mission critical servers to a Microsoft anti-malware solution? Take the survey and talk back below.
Should Microsoft provide a server anti-malware solution?
* Yes! I need to save the money and I want the real-time updates
* Yes they should, but I'd still use a 3rd-party solution
* No, Morro should stay consumer-oriented; I want a robust solution
* Who cares? That's what Clamwin is for
Source: zdnet
While every Windows server obviously needs anti-malware protection, terminal servers and others providing virtual desktops or remote access could clearly benefit from the real-time protection promised by Microsoft’s Morro project (now officially known as Microsoft Security Essentials). There are those, in fact, who see it as Microsoft’s responsibility to provide malware protection for all of its products, given their penchant for attracting malicious code.
Unfortunately, MSE is only available for Windows XP, Vista, and 7. No mention of servers. No Googling suggested that server support is in the pipeline. While Clamwin does a perfectly adequate job protecting servers, full-blown server anti-malware solutions aren’t cheap and, again, lack MSE’s near real-time updates.
Then again, would you entrust your mission critical servers to a Microsoft anti-malware solution? Take the survey and talk back below.
Should Microsoft provide a server anti-malware solution?
* Yes! I need to save the money and I want the real-time updates
* Yes they should, but I'd still use a 3rd-party solution
* No, Morro should stay consumer-oriented; I want a robust solution
* Who cares? That's what Clamwin is for
Source: zdnet
Monday, June 22, 2009
Microsoft patches WebDAV security vulnerability in bevy of updates
Microsoft patched a WebDAV security vulnerability in Microsoft Internet Information Services (IIS) Web server as part of its monthly Patch Tuesday bulletin release. In all, the software giant issued 10 bulletins, six labeled critical in a mammoth release of security fixes addressing 31 vulnerabilities.
Microsoft acknowledged the IIS Web server flaw last month after the U.S. Computer Emergency Response Team warned of publicly available exploit code and active exploitation of the vulnerability. MS09-020 patches a remote authentication bypass vulnerability in the IIS WebDAV extension, a collection of tools used to publish content to IIS Web servers. The WebDAV vulnerability, which was discovered by security researchers at Palo Alto Networks, is due to the lack of proper checks on the URL in a WebDAV request, leading to a bypass on IIS directories. Microsoft IIS versions 5.0-6.0 are affected. The update is rated important. If successfully exploited, it could give an attacker elevated privileges to gain access to sensitive data.
Source: searchsecurity.techtarget.com/news/article/0,289142,sid14_gci1358796,00.html
Microsoft acknowledged the IIS Web server flaw last month after the U.S. Computer Emergency Response Team warned of publicly available exploit code and active exploitation of the vulnerability. MS09-020 patches a remote authentication bypass vulnerability in the IIS WebDAV extension, a collection of tools used to publish content to IIS Web servers. The WebDAV vulnerability, which was discovered by security researchers at Palo Alto Networks, is due to the lack of proper checks on the URL in a WebDAV request, leading to a bypass on IIS directories. Microsoft IIS versions 5.0-6.0 are affected. The update is rated important. If successfully exploited, it could give an attacker elevated privileges to gain access to sensitive data.
Researchers at security vendor Core Security Technologies discovered one of the IE flaws in October 2008. A security zone bypass vulnerability allows a website to perform actions, such as executing code, despite being disabled by the security level of a given Security Zone.
"In this case this is a variation of a previous bug, but this is a very important one," said Ivan Arce, chief technology officer of Core Security. "This is important enough to require people to address it quickly."
Other Microsoft Bulletins:
|
Source: searchsecurity.techtarget.com/news/article/0,289142,sid14_gci1358796,00.html
Sunday, June 14, 2009
Cloud computing security to grow in 2009
While enterprise users continue to spend a large percentage of their workday involved with messaging activities, the Internet remains a dangerous place for users. Websense, for example, reported that 57 percent of attacks are delivered via the Web. Commtouch found that SPAM accounted for 72 percent of all email traversing the Internet in the first quarter of 2009.
At the same time, today’s economic climate favors cost-effective solutions. IT expects to spend significantly less in 2009 than in 2008 on messaging. Nearly half (47 percent) of respondents expected IT spending to be lower in 2009 versus 18 percent who made similar projections last year.
As such, while server-based solutions will continue to dominate the messaging security market, cloud-based solutions will constitute a growing percentage of purchases. The number of respondents who deployed hosted security services grew by nine percentage points since last year. Over the next 12 months hosted anti-spam services, such as those offered by Kaspersky, Trend Micro and more recently Microsoft, are also expected to show their greatest growth.
Comprehensive security solutions will be particularly hot over the next 12 months. Although the vast majority of enterprises today deal with separate vendors for their various best-of-breed solutions, the number of respondents preferring a consolidated comprehensive centrally managed messaging security solution double while individual best of breed solutions dropped significantly.

At the same time, today’s economic climate favors cost-effective solutions. IT expects to spend significantly less in 2009 than in 2008 on messaging. Nearly half (47 percent) of respondents expected IT spending to be lower in 2009 versus 18 percent who made similar projections last year.
As such, while server-based solutions will continue to dominate the messaging security market, cloud-based solutions will constitute a growing percentage of purchases. The number of respondents who deployed hosted security services grew by nine percentage points since last year. Over the next 12 months hosted anti-spam services, such as those offered by Kaspersky, Trend Micro and more recently Microsoft, are also expected to show their greatest growth.
Comprehensive security solutions will be particularly hot over the next 12 months. Although the vast majority of enterprises today deal with separate vendors for their various best-of-breed solutions, the number of respondents preferring a consolidated comprehensive centrally managed messaging security solution double while individual best of breed solutions dropped significantly.

Sunday, June 7, 2009
Remote Server Monitoring Software - DreamSys Server Monitor
DreamSys Server Monitor, once a commercial remote server monitoring software, is now available as a free download from the developer’s homepage. The user still needs to enter registration information after installation. They are however available on the homepage without the need for registration or any other kind of data grabbing. The Server Monitor application can be used to monitor servers over a network or the Internet.
The system administrator starts by adding new servers that should be monitored to the application. Required information are a unique name, the server address and the monitoring type. Available monitoring types are TCP / IP, Ping or Services. Additional information might be required depending on the type selected. A TCP / IP monitoring for example requires a port that can be added in the same interface.

Three notification types are available. The administrator can be informed by email, message box or net message.
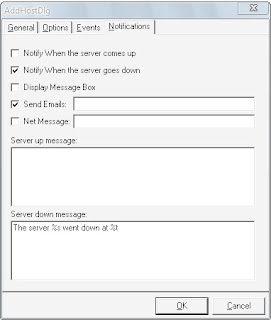
Specific parameters for every server can be configured in the Configuration View tab. It allows the user to change the monitoring interval, configure the connection timeout, set the mail server and enable the logging of events.

DreamSys Server Monitor can be used as a Internet or network monitoring software. It lacks some of the features of advanced monitoring applications that offer website or database monitoring but could be enough for administrators who do not need that functionality.
Source: ghacks.net/2009/06/06/remote-server-monitoring-software-dreamsys-server-monitor/
The system administrator starts by adding new servers that should be monitored to the application. Required information are a unique name, the server address and the monitoring type. Available monitoring types are TCP / IP, Ping or Services. Additional information might be required depending on the type selected. A TCP / IP monitoring for example requires a port that can be added in the same interface.

Three notification types are available. The administrator can be informed by email, message box or net message.

Specific parameters for every server can be configured in the Configuration View tab. It allows the user to change the monitoring interval, configure the connection timeout, set the mail server and enable the logging of events.

DreamSys Server Monitor can be used as a Internet or network monitoring software. It lacks some of the features of advanced monitoring applications that offer website or database monitoring but could be enough for administrators who do not need that functionality.
Source: ghacks.net/2009/06/06/remote-server-monitoring-software-dreamsys-server-monitor/
Monday, June 1, 2009
Forefront Security for Exchange Server SP1
Customers running Forefront Security for Exchange Server Service Pack 1 can now access a free tool from Microsoft designed to offer guidance on the factors capable of impacting their messaging servers. Adding security solutions to a server is a move that generally implies a tradeoff, as extra protection is, as a rule, synonymous with performance and throughput handicaps. The same is valid for Exchange Servers, but with the capacity planning tool, customers can take the necessary measures to compensate for the effects that the introduction of Forefront Security will have on their server infrastructure.
“The Forefront Security for Exchange Server capacity planning tool helps you understand what hardware, architecture, and configuration settings will produce recommended system performance and message throughput results for comprehensive protection of your Exchange Servers. The tool is an Excel spreadsheet with built-in workflow and can be used to help plan your Forefront Security for Exchange Server 10 SP1/SP2 deployment,” revealed Frank Trujillo, program manager, FSS.
Customers who are planning a deployment of Forefront Security for Exchange Server SP1 can turn to the capacity planning tool to fine tune the details of their implementation. But at the same time, the resource can be used to assess impact on existing deployments. According to Trujillo, a range of information is necessary in order to use the capacity planning tool, including server hardware and user load data for a specific Exchange Server environment.
For full info visit here: http://news.softpedia.com/news/Download-Forefront-Security-for-Exchange-Server-SP1-Capacity-Planning-Tool-112973.shtml
“The Forefront Security for Exchange Server capacity planning tool helps you understand what hardware, architecture, and configuration settings will produce recommended system performance and message throughput results for comprehensive protection of your Exchange Servers. The tool is an Excel spreadsheet with built-in workflow and can be used to help plan your Forefront Security for Exchange Server 10 SP1/SP2 deployment,” revealed Frank Trujillo, program manager, FSS.
Customers who are planning a deployment of Forefront Security for Exchange Server SP1 can turn to the capacity planning tool to fine tune the details of their implementation. But at the same time, the resource can be used to assess impact on existing deployments. According to Trujillo, a range of information is necessary in order to use the capacity planning tool, including server hardware and user load data for a specific Exchange Server environment.
For full info visit here: http://news.softpedia.com/news/Download-Forefront-Security-for-Exchange-Server-SP1-Capacity-Planning-Tool-112973.shtml
Tuesday, May 26, 2009
Steps to Maintain and Secure Your Computer
There are some basic steps for Computer Maintenance which helps the users to run computer smoothly:--
1. We should perform the "disk cleanup" task on the regular or weekly basis.
2. We should perform the "defrag" task on the monthly basis.
3. We should un-install all unwanted programs from your computer.
4. We should remove all the unwanted startups items by using the "msconfig" utility.
5. We should always delete all the temporary internet files like "temp, %temp% and prefetch files" from your computer.
6. We should perform "scan disk" task on the monthly basis.
7. We should take the back up of backup of some important files and registries before performing any task on computer.
8. We should keep at least 5% free space on the 'C' drive.
9. We have to use power button to make the computer off in critical conditions.
Now, I am providing some tips related to "Computer Security" that helps the users to run the computer without any virus threats. These are the following steps for the "Computer Security”:--
1. You should scan your computer by using any updated anti virus program.
2. You should install and download any anti-malware program like "Anti-malwarebytes" for the malwares issues.
3. You should update "Anti-malwarebytes" program over the specific time.
4. You should scan computer using the "Anti-malwarebytes" program.
5. You should follow the same procedure for "Superanti-spyware" program as we have done for "Anti-malwarebytes".
6. You should delete all the Internet temporary files like temp, %temp% and prefetch files.
Your computer will run smoothly and properly by following all these above troubleshooting steps. We can conclude that It is very necessary to have knowledge of the "Computer Maintenance and Security" and some support for the computer. These safety guidelines help the user to run the computer smoothly and properly. There are also some good companies which are providing the support like iYogi Technical Services Pvt. Ltd, IBM, Microsoft, Dell, HP and many more. We need to update all the security software on the regular basis.
1. We should perform the "disk cleanup" task on the regular or weekly basis.
2. We should perform the "defrag" task on the monthly basis.
3. We should un-install all unwanted programs from your computer.
4. We should remove all the unwanted startups items by using the "msconfig" utility.
5. We should always delete all the temporary internet files like "temp, %temp% and prefetch files" from your computer.
6. We should perform "scan disk" task on the monthly basis.
7. We should take the back up of backup of some important files and registries before performing any task on computer.
8. We should keep at least 5% free space on the 'C' drive.
9. We have to use power button to make the computer off in critical conditions.
Now, I am providing some tips related to "Computer Security" that helps the users to run the computer without any virus threats. These are the following steps for the "Computer Security”:--
1. You should scan your computer by using any updated anti virus program.
2. You should install and download any anti-malware program like "Anti-malwarebytes" for the malwares issues.
3. You should update "Anti-malwarebytes" program over the specific time.
4. You should scan computer using the "Anti-malwarebytes" program.
5. You should follow the same procedure for "Superanti-spyware" program as we have done for "Anti-malwarebytes".
6. You should delete all the Internet temporary files like temp, %temp% and prefetch files.
Your computer will run smoothly and properly by following all these above troubleshooting steps. We can conclude that It is very necessary to have knowledge of the "Computer Maintenance and Security" and some support for the computer. These safety guidelines help the user to run the computer smoothly and properly. There are also some good companies which are providing the support like iYogi Technical Services Pvt. Ltd, IBM, Microsoft, Dell, HP and many more. We need to update all the security software on the regular basis.
Tuesday, May 19, 2009
Red5 Media Server and Security
Here are the steps to configure SSL in existing Red5 application.
Software required on machine where Red5 server is installed:-
1: Open SSL //Open source SSL libraries required for compiling Stunnel
2: Stunnel //Open source SSL wrapper software uses open SSL works both on
Windows and Linux.
3: gcc // The GNU C compiler (although it always bundled with Linux
Machine, but I did not find it. Necessary if you are compiling the Open SSL and Stunnel from source. Not required if using RPM
Configuration needed on server machine:-
1:- Install the Open SSL (if windows use exe RPM or source for Linux machine can be downloaded from openssl website).
2:- Install Stunnel (if windows, use exe otherwise RPM or compilation from source is preferred, can be downloaded from stunnel website). Make sure that you already have compiled Open SSL in your machine before proceeding with the installation of Stunnel; otherwise it will fail to compile.
Under Linux the standard command to compile Stunnel from source are described below. For any update please always follow the installation instructions given their website.
machine# gzip -dc stunnel-VERSION.tar.gz tar -xvzf -
machine# cd stunnel-VERSION
machine# ./configure
machine# make
machine# make install
There are several configurations that differ based on your computer and environment. That can be read from the website itself.
3:- Running Stunnel
To run stunnel, you always require a configuration file. The process of making sample configuration file (stunnel.conf) is described below.
The sample configuration file used was like this:
sample.conf
; Sample stunnel configuration file by Sunil Gupta 2007
; Some options used here may not be adequate for your particular configuration
; Certificate/key is needed in server mode and optional in client mode
; The default certificate is provided only for testing and should not
; be used in a production environment
cert = /etc/stunnel/stunnel.pem
;chroot = /var/run/stunnel/
pid = /stunnel.pid
key = /etc/stunnel/stunnel.pem
; Some performance tunings
socket = l:TCP_NODELAY=1
socket = r:TCP_NODELAY=1
; Workaround for Eudora bug
;options = DONT_INSERT_EMPTY_FRAGMENTS
; Authentication stuff
;verify = 2
; Don't forget to c_rehash CApath
;CApath = certs
; It's often easier to use CAfile
;CAfile = certs.pem
; Don't forget to c_rehash CRLpath
;CRLpath = crls
; Alternatively you can use CRLfile
;CRLfile = crls.pem
; Some debugging stuff useful for troubleshooting
debug = 7
Output = /var/log/stunnel.log
foreground=yes
; Use it for client mode
; client = yes
; Service-level configuration
;[pop3s]
;accept = 995
;connect = 110
;[imaps]
;accept = 993
;connect = 143
;[ssmtp]
;accept = 465
;connect = 25
[rtmps - https]
TIMEOUTconnect=20
accept = 443
connect = 80
TIMEOUTclose = 20
; vim:ft=dosin
Finish
Note: - When you install Stunnel, you get a default sample file, which is not enough in most of the cases to run the flash application. The additions to configuration file I made are as follows.
Also the line having ; in the start denotes the commented portion in file.
cert = /etc/stunnel/stunnel.pem
key = /etc/stunnel/stunnel.pem
pem stands for 'privacy enhanced mail' used as a key format. The above two lines tells the location of pem files need to be generated. This will be configured by user. The above is the best location for Stunnel although you can change it to any desired location.
;Some performance tunings
socket = l:TCP_NODELAY=1
socket = r:TCP_NODELAY=1
The above two lines are for better performance of Stunnel in our case.
; Workaround for Eudora bug
;options = DONT_INSERT_EMPTY_FRAGMENTS
The above line is a bug in a specific platform, since we are running it in Linux; we commented this line, although it could be needed in some case.
; Some debugging stuff useful for troubleshooting
debug = 7
Output = /var/log/stunnel.log
foreground=yes
The above lines are very important, Because Stunnel by default run in background mode. You will never be able to see if it is running. So better to put it in foreground, so that you can make sure that stunnel is running properly. Also the debug = 7 is very important since by default stunnel does not generate any log. You can direct him to generate log, so that you can debug your application by seeing all those log messages. The above mentioned log directory is default Linux directory where all system logs are generated.
; Use it for client mode
; client = yes
In the sample configuration file, you will always find this option un-commented leading to a different architecture, since we are running Stunnel in server mode not client mode, so we will comment this line.
[rtmps - https]
TIMEOUTconnect=20
accept = 443
connect = 80
TIMEOUTclose = 20
And the very last lines are mentioned above. In the sample configuration file, you will never find rtmps and it is not even mentioned anywhere in Stunnel. The default file contains only https, add rtmps like it is added here. Also accept port is 443, which is the default port used for secure communication and it is open like port 80 in all corporate firewalls in general. This port is to accept the connection from flash and to get the encrypted data. The connect port is 80; this is the port where stunnel will forward the decrypted data to red5 server.
The TIMEOUTconnect and TIMEOUTclose can be useful in some cases when the server where the data is being forwarded by Stunnel is delaying the connection. This is to make sure that connection is closed only when server is not responding at all. The value is in seconds (i.e. 20 sec.)
Now in order to run your application under secure connection, you require a certificate to be created on the machine where the Stunnel is installed. The procedure for creating a certificate and the possible directory to put this certificate is described below.
Use of certificate:-
When an SSL client connects to an SSL server, the server presents a certificate, essentially an electronic piece of proof that machine is who it claims to be. This certificate is signed by a 'Certificate Authority' (hereafter a CA) -- usually a trusted third party like Verisign. A client will accept this certificate only if
The certificate presented matches the private key being used by the remote end.
The certificate has been signed correctly by the CA. The client recognizes the CA as trusted.
Every stunnel server has a private key. This is contained in the pem file which stunnel uses to initialize its identity. If we notice above, we have given the reference of this pem file in the start of our configuration file under cert.
This private key is put in /usr/local/ssl/certs/stunnel.pem.
Note:-Under client mode we need not to have certificate in most of the cases, but if we are running it in server mode, we require a certificate. Since we are using server mode, I have generated a self certificate.
To make certificate:-
1: Go to /etc/stunnel directory and
2: Run the following command:-'
openssl req -new -x509 -days 365 -nodes -config stunnel.cnf -out stunnel.pem -keyout stunnel.pem
This creates a private key and self-signed certificate. More information on the options of this can be read from FAQ section of Stunnel website.
While executing the command, it will ask for some questions like Country, City, Company etc., Give the answer of those and it will generate the key and self certificate.
4:- Put your sample.conf file in /etc/stunnel directory where the .pem file was created earlier.
5:- Start Stunnel by issuing the command -
machine# stunnel stunnel.conf
If you are /etc/stunnel directory otherwise complete path of configuration file-
machine# stunnel /etc/stunnel/stunnel.conf
The above command will start the stunnel and you can verify the log from /var/logs/stunnel.log file.
Red5 server side changes:-
6:- Now stunnel is up and running, we need to change the Red5 configuration to accept the connection from Stunnel.
Go to red5 installation directory and search for conf folder where all red5 configuration files exist.
Open red5.properties file and under rtmps.host_port property put 443. The sample file can be like below.
rtmp.host_port = 0.0.0.0:1935
rtmp.threadcount = 4
debug_proxy.host_port = 0.0.0.0:1936
proxy_forward.host_port = 127.0.0.1:1935
rtmps.host_port = 127.0.0.1:443
http.host=0.0.0.0
http.port=5080
rtmpt.host=0.0.0.0
rtmpt.port=80
Flash client side changes:-
7:-Now we are done with server side, In order to run application under SSL, we need to change the client side protocol from rtmp to rtmps like below. And compile the flash client and run it on browser, a certificate will pop up, accept it and the application will run under SSL.
nc.connect ("rtmps://yourip/applicationname"); //used rtmps in place of rtmp
Source:http://ezinearticles.com/?Red5-Media-Server-and-Security&id=1226458
Software required on machine where Red5 server is installed:-
1: Open SSL //Open source SSL libraries required for compiling Stunnel
2: Stunnel //Open source SSL wrapper software uses open SSL works both on
Windows and Linux.
3: gcc // The GNU C compiler (although it always bundled with Linux
Machine, but I did not find it. Necessary if you are compiling the Open SSL and Stunnel from source. Not required if using RPM
Configuration needed on server machine:-
1:- Install the Open SSL (if windows use exe RPM or source for Linux machine can be downloaded from openssl website).
2:- Install Stunnel (if windows, use exe otherwise RPM or compilation from source is preferred, can be downloaded from stunnel website). Make sure that you already have compiled Open SSL in your machine before proceeding with the installation of Stunnel; otherwise it will fail to compile.
Under Linux the standard command to compile Stunnel from source are described below. For any update please always follow the installation instructions given their website.
machine# gzip -dc stunnel-VERSION.tar.gz tar -xvzf -
machine# cd stunnel-VERSION
machine# ./configure
machine# make
machine# make install
There are several configurations that differ based on your computer and environment. That can be read from the website itself.
3:- Running Stunnel
To run stunnel, you always require a configuration file. The process of making sample configuration file (stunnel.conf) is described below.
The sample configuration file used was like this:
sample.conf
; Sample stunnel configuration file by Sunil Gupta 2007
; Some options used here may not be adequate for your particular configuration
; Certificate/key is needed in server mode and optional in client mode
; The default certificate is provided only for testing and should not
; be used in a production environment
cert = /etc/stunnel/stunnel.pem
;chroot = /var/run/stunnel/
pid = /stunnel.pid
key = /etc/stunnel/stunnel.pem
; Some performance tunings
socket = l:TCP_NODELAY=1
socket = r:TCP_NODELAY=1
; Workaround for Eudora bug
;options = DONT_INSERT_EMPTY_FRAGMENTS
; Authentication stuff
;verify = 2
; Don't forget to c_rehash CApath
;CApath = certs
; It's often easier to use CAfile
;CAfile = certs.pem
; Don't forget to c_rehash CRLpath
;CRLpath = crls
; Alternatively you can use CRLfile
;CRLfile = crls.pem
; Some debugging stuff useful for troubleshooting
debug = 7
Output = /var/log/stunnel.log
foreground=yes
; Use it for client mode
; client = yes
; Service-level configuration
;[pop3s]
;accept = 995
;connect = 110
;[imaps]
;accept = 993
;connect = 143
;[ssmtp]
;accept = 465
;connect = 25
[rtmps - https]
TIMEOUTconnect=20
accept = 443
connect = 80
TIMEOUTclose = 20
; vim:ft=dosin
Finish
Note: - When you install Stunnel, you get a default sample file, which is not enough in most of the cases to run the flash application. The additions to configuration file I made are as follows.
Also the line having ; in the start denotes the commented portion in file.
cert = /etc/stunnel/stunnel.pem
key = /etc/stunnel/stunnel.pem
pem stands for 'privacy enhanced mail' used as a key format. The above two lines tells the location of pem files need to be generated. This will be configured by user. The above is the best location for Stunnel although you can change it to any desired location.
;Some performance tunings
socket = l:TCP_NODELAY=1
socket = r:TCP_NODELAY=1
The above two lines are for better performance of Stunnel in our case.
; Workaround for Eudora bug
;options = DONT_INSERT_EMPTY_FRAGMENTS
The above line is a bug in a specific platform, since we are running it in Linux; we commented this line, although it could be needed in some case.
; Some debugging stuff useful for troubleshooting
debug = 7
Output = /var/log/stunnel.log
foreground=yes
The above lines are very important, Because Stunnel by default run in background mode. You will never be able to see if it is running. So better to put it in foreground, so that you can make sure that stunnel is running properly. Also the debug = 7 is very important since by default stunnel does not generate any log. You can direct him to generate log, so that you can debug your application by seeing all those log messages. The above mentioned log directory is default Linux directory where all system logs are generated.
; Use it for client mode
; client = yes
In the sample configuration file, you will always find this option un-commented leading to a different architecture, since we are running Stunnel in server mode not client mode, so we will comment this line.
[rtmps - https]
TIMEOUTconnect=20
accept = 443
connect = 80
TIMEOUTclose = 20
And the very last lines are mentioned above. In the sample configuration file, you will never find rtmps and it is not even mentioned anywhere in Stunnel. The default file contains only https, add rtmps like it is added here. Also accept port is 443, which is the default port used for secure communication and it is open like port 80 in all corporate firewalls in general. This port is to accept the connection from flash and to get the encrypted data. The connect port is 80; this is the port where stunnel will forward the decrypted data to red5 server.
The TIMEOUTconnect and TIMEOUTclose can be useful in some cases when the server where the data is being forwarded by Stunnel is delaying the connection. This is to make sure that connection is closed only when server is not responding at all. The value is in seconds (i.e. 20 sec.)
Now in order to run your application under secure connection, you require a certificate to be created on the machine where the Stunnel is installed. The procedure for creating a certificate and the possible directory to put this certificate is described below.
Use of certificate:-
When an SSL client connects to an SSL server, the server presents a certificate, essentially an electronic piece of proof that machine is who it claims to be. This certificate is signed by a 'Certificate Authority' (hereafter a CA) -- usually a trusted third party like Verisign. A client will accept this certificate only if
The certificate presented matches the private key being used by the remote end.
The certificate has been signed correctly by the CA. The client recognizes the CA as trusted.
Every stunnel server has a private key. This is contained in the pem file which stunnel uses to initialize its identity. If we notice above, we have given the reference of this pem file in the start of our configuration file under cert.
This private key is put in /usr/local/ssl/certs/stunnel.pem.
Note:-Under client mode we need not to have certificate in most of the cases, but if we are running it in server mode, we require a certificate. Since we are using server mode, I have generated a self certificate.
To make certificate:-
1: Go to /etc/stunnel directory and
2: Run the following command:-'
openssl req -new -x509 -days 365 -nodes -config stunnel.cnf -out stunnel.pem -keyout stunnel.pem
This creates a private key and self-signed certificate. More information on the options of this can be read from FAQ section of Stunnel website.
While executing the command, it will ask for some questions like Country, City, Company etc., Give the answer of those and it will generate the key and self certificate.
4:- Put your sample.conf file in /etc/stunnel directory where the .pem file was created earlier.
5:- Start Stunnel by issuing the command -
machine# stunnel stunnel.conf
If you are /etc/stunnel directory otherwise complete path of configuration file-
machine# stunnel /etc/stunnel/stunnel.conf
The above command will start the stunnel and you can verify the log from /var/logs/stunnel.log file.
Red5 server side changes:-
6:- Now stunnel is up and running, we need to change the Red5 configuration to accept the connection from Stunnel.
Go to red5 installation directory and search for conf folder where all red5 configuration files exist.
Open red5.properties file and under rtmps.host_port property put 443. The sample file can be like below.
rtmp.host_port = 0.0.0.0:1935
rtmp.threadcount = 4
debug_proxy.host_port = 0.0.0.0:1936
proxy_forward.host_port = 127.0.0.1:1935
rtmps.host_port = 127.0.0.1:443
http.host=0.0.0.0
http.port=5080
rtmpt.host=0.0.0.0
rtmpt.port=80
Flash client side changes:-
7:-Now we are done with server side, In order to run application under SSL, we need to change the client side protocol from rtmp to rtmps like below. And compile the flash client and run it on browser, a certificate will pop up, accept it and the application will run under SSL.
nc.connect ("rtmps://yourip/applicationname"); //used rtmps in place of rtmp
Source:http://ezinearticles.com/?Red5-Media-Server-and-Security&id=1226458
Wednesday, May 13, 2009
How to Extract IDs and Security Policy from Windows Servers?
Windows server security is main concern because server is the heart of a small business. So its better to provide good server security. So we have to review in short span of time all server security.
Check password policy set in the Windows Operating System i.e. password is required, no expiration, minimum password length. Weak or IDs without passwords are an open invitation for intruder to hack into your computer systems.
Step 1 How to extract IDs and Security Policies From the Windows Server.
a) I use a neat free tool called Somarsoft ACL.
b) Install the tool and Run DumpSec program.
c) Extract the permissions of user, group, file system, registry, password policy and other information you find useful.
Step 2 Cross check the IDs with the Administrator
a) Once you have extracted these information, cross check with the administrator if all the IDs and password policy extracted from the tool are valid and necessary.
b) Delete or disable the unnecessary IDs and enforce the stronger password policy.
c) Further ensure that only IDs that are absolutely required are active and enforce a strong password policy using Windows Active Directory. e.g. complex alphanumeric password, 180 days password expiration. As for PC make sure the administrator password is changed and only known by yourself/office administrator.
d) Everyone else should use basic IDs.
e) Activate password for the screen saver to lock the PC screen when there is no activity for say 10 minutes.
f) Educate all users on the importance of computer security.
g) One of the reminders I usually highlight is do not share passwords and do not stick the password in front of the computer monitor for all to view.
Source: Ezine
Thursday, May 7, 2009
New Version of Security System by TrendMicro
Trend Micro, a provider of internet content security, has launched version 5.1 of its Worry-Free Business Security for small businesses that require integrated defense and automatic web threat protection against emerging web threats with minimal administrative requirements.
According to Trend Micro, Worry-Free Business Security 5.1, a single, all-in-one suite, now protects businesses running the new windows essential server solutions: Microsoft Small Business Server 2008; and Microsoft Essential Business Server 2008. It also protects Microsoft Exchange 2007 on Windows Server 2008 users. With Worry-Free Business Security 5.1, viruses, spyware, spam and emerging Web threats are blocked before they reach a company's network.
Supported by the Trend Micro smart protection network, a next-generation cloud-client content security infrastructure designed to protect customers from web threats, Trend Micro Worry-Free Business Security 5.1 offers small and medium sized businesses safer, smarter and simpler security to protect themselves from the dramatic increase in cyber crime and web threats.
For Detail Info: http://security.cbronline.com/news/trend_micro_launches_new_version_of_security_system_240409
Monday, May 4, 2009
Adobe Releases Update for Server-Side Security Flaw
Adobe has released an update to address a potential vulnerability in versions of its Flash Media Server.
Specifically, the newest vulnerability exists in Flash Media Server version 3.5.1 (and earlier) and Adobe Flash Media Interactive Server 3.5.1 and earlier. The update resolves a remote procedure call (RPC) execution issue that could enable an attacker to “execute remote procedures within a server-side ActionScript file running on Flash Media Server,” according to a security bulletin on its support site.
The release notes for the update say further that the fix “updated the server with the OpenSSL Security Advisory recommendations for the vulnerability tracked as CVE-2008-5077 by OpenSSL.” According to the description of the vulnerability, a way to exploit it would be for a hacker "who uses a 'man in the middle' attack to present a malformed SSL/TLS signature from a certificate chain to a vulnerable client, bypassing validation.”
Adobe categorizes this as an important issue, and recommends users update now.
Source: scmagazineus.com/Adobe-releases-update-for-server-side-security-flaw/article/136044/
Specifically, the newest vulnerability exists in Flash Media Server version 3.5.1 (and earlier) and Adobe Flash Media Interactive Server 3.5.1 and earlier. The update resolves a remote procedure call (RPC) execution issue that could enable an attacker to “execute remote procedures within a server-side ActionScript file running on Flash Media Server,” according to a security bulletin on its support site.
The release notes for the update say further that the fix “updated the server with the OpenSSL Security Advisory recommendations for the vulnerability tracked as CVE-2008-5077 by OpenSSL.” According to the description of the vulnerability, a way to exploit it would be for a hacker "who uses a 'man in the middle' attack to present a malformed SSL/TLS signature from a certificate chain to a vulnerable client, bypassing validation.”
Adobe categorizes this as an important issue, and recommends users update now.
Source: scmagazineus.com/Adobe-releases-update-for-server-side-security-flaw/article/136044/
Thursday, April 30, 2009
How to Secure Local Administrators Group on Every Desktop
Task 1 - Remove Domain User Account
The initial task of securing the local Administrators group is to ensure that the user no longer has membership in the group. This is easier said than done, since most companies have configured the user’s domain account to have membership in this group at installation of the user’s computer.
Consider a scenario where you have resolved the issue of having users running as local Administrator and now you need to remove the domain user accounts from the local Administrators group on every desktop in your environment. You only have 10,000 desktops, laptops, and remote users.
If you create a script to perform this task, you are relying on the user to logoff and back on for the script to run. Not likely to happen on even half of the desktops, so you need another option.
As a perfect solution, you can use the Local Group – Group Policy Preference to accomplish the task within about 90 minutes of you implementing it. To get the job done, you simply need to edit a Group Policy Object (GPO) and configure the following policy:
User Configuration\Preferences\Control Panel Settings\Local Users and Groups\New\Local Group, which will open up the New Local Group Properties dialog box.
After you open up this property sheet, simply select the Remove the current user radio button. This will affect all user accounts that are in the scope of management of the GPO containing this setting. This setting will apply during the next Group Policy background refresh, which is under 90 minutes.
Task 2 - Add Domain Admins and Local Administrator
The next phase of your securing the local Administrators group is to ensure that the Domain Admins global group and the local Administrator account are both added to the local Administrators group in every desktop.
Many have attempted this by using the Restricted Groups policy that has been in Windows Active Directory Group Policy from the onset. The problem with this solution is that the Restricted Groups policy is a “delete and replace” policy, not an “append” policy. Thus, when you configure a policy to perform this task, you will wipe out the contents of the local Administrators group, replacing it with only these two accounts.
By using the Local Users and Groups policy that was described in Task 1, you can not only remove the current logged on user, but you can add in the two key accounts that will ensure you have the correct administrative privileges set on each desktop.
Task 3 - Remove Specific Accounts
The final stage of securing the local Administrators group is to ensure that only the correct accounts have membership. In many cases, there have been groups from the domain added to the local Administrators group to perform a specific task, complete a project, or perform maintenance. If these groups are no longer needed in the local Administrators group, you can simply remove them with the new Local Users and Groups policy.
In a similar fashion that you added the two accounts in task 2, you can add accounts to the policy that need to be removed. To do this, ensure that you select the "Remove from this group" option when you add the account to the policy.
Obtaining the Tools and the Rules
In order for you to take advantage of these settings, you only need to have ONE of the following on your network:
* Windows Server 2008 Server
* Windows Vista SP1, with the Remote Server Administrative Tool set installed
Both of these operating systems come with the new and improved Group Policy Management Console and Group Policy Management Editor.
The settings that are included in the new Group Policy Preferences can apply to the following operating systems:
* Windows XP SP2 and higher
* Windows Server 2003 SP1 and higher
* Windows Vista SP1 and higher
* Windows Server 2008 and higher
Source
The initial task of securing the local Administrators group is to ensure that the user no longer has membership in the group. This is easier said than done, since most companies have configured the user’s domain account to have membership in this group at installation of the user’s computer.
Consider a scenario where you have resolved the issue of having users running as local Administrator and now you need to remove the domain user accounts from the local Administrators group on every desktop in your environment. You only have 10,000 desktops, laptops, and remote users.
If you create a script to perform this task, you are relying on the user to logoff and back on for the script to run. Not likely to happen on even half of the desktops, so you need another option.
As a perfect solution, you can use the Local Group – Group Policy Preference to accomplish the task within about 90 minutes of you implementing it. To get the job done, you simply need to edit a Group Policy Object (GPO) and configure the following policy:
User Configuration\Preferences\Control Panel Settings\Local Users and Groups\New\Local Group, which will open up the New Local Group Properties dialog box.
After you open up this property sheet, simply select the Remove the current user radio button. This will affect all user accounts that are in the scope of management of the GPO containing this setting. This setting will apply during the next Group Policy background refresh, which is under 90 minutes.
Task 2 - Add Domain Admins and Local Administrator
The next phase of your securing the local Administrators group is to ensure that the Domain Admins global group and the local Administrator account are both added to the local Administrators group in every desktop.
Many have attempted this by using the Restricted Groups policy that has been in Windows Active Directory Group Policy from the onset. The problem with this solution is that the Restricted Groups policy is a “delete and replace” policy, not an “append” policy. Thus, when you configure a policy to perform this task, you will wipe out the contents of the local Administrators group, replacing it with only these two accounts.
By using the Local Users and Groups policy that was described in Task 1, you can not only remove the current logged on user, but you can add in the two key accounts that will ensure you have the correct administrative privileges set on each desktop.
Task 3 - Remove Specific Accounts
The final stage of securing the local Administrators group is to ensure that only the correct accounts have membership. In many cases, there have been groups from the domain added to the local Administrators group to perform a specific task, complete a project, or perform maintenance. If these groups are no longer needed in the local Administrators group, you can simply remove them with the new Local Users and Groups policy.
In a similar fashion that you added the two accounts in task 2, you can add accounts to the policy that need to be removed. To do this, ensure that you select the "Remove from this group" option when you add the account to the policy.
Obtaining the Tools and the Rules
In order for you to take advantage of these settings, you only need to have ONE of the following on your network:
* Windows Server 2008 Server
* Windows Vista SP1, with the Remote Server Administrative Tool set installed
Both of these operating systems come with the new and improved Group Policy Management Console and Group Policy Management Editor.
The settings that are included in the new Group Policy Preferences can apply to the following operating systems:
* Windows XP SP2 and higher
* Windows Server 2003 SP1 and higher
* Windows Vista SP1 and higher
* Windows Server 2008 and higher
Source
Wednesday, April 22, 2009
Terminal Server Application Server Security
Since the actual user sessions are executed on the Terminal Servers, they figure greater into a discussion of security. The basic actions to consider when securing your Terminal Servers are:
* Using the NTFS file system.
* Configuring NTFS file permissions.
* Using GPOs to secure the user environment.
* Installing Terminal Services on a domain controller.
* Disabling the "Secondary Logon" Service.
* Remove unnecessary software
* Applying hotfixes and service packs.
Use the NTFS File System
Each user that runs a session on a Terminal Server is essentially running a remote control console session. Without an NTFS file system, you won't be able to set any file-level security permissions. Any user that is logged would be able to access files in use by other users. No mechanism would prevent users from deleting key system files, potentially crashing the server!
There is no reason not to use NTFS on your servers. Every user will be able to access NTFS files via an RDP session, even if his client is running on an operating system that cannot support NTFS, such as Windows 95.
Configure NTFS File Permissions
Using just the NTFS file system might not provide enough security with its default permissions in your environment. Even if you do not intend to fully lock-down your Terminal Servers or plan to run only initial applications, you should secure the basic file system.
When you install Terminal Services on a Windows 2003 server, you're asked whether you want to use "Full Security" or "Relaxed Security." This security setting has nothing to do with your domain configuration or your Active Directory environment. It affects only the level of security that users are given when they access your server via a Terminal Services session. To compare the two settings:
* Full Security. This setting results in Terminal Services users having the same permissions as regular members of the local users group. Regular users are not able to write to inappropriate registry keys or tamper with sensitive system files. Of course, with this level of security comes additional risk. In this case, users will sometimes not be able to run legacy applications. If you choose Full Security, you should thoroughly test your applications before enabling them for any users.
* Relaxed Security This setting results in Terminal Services users having full access to many parts of the registry and many of the system files. This alternate level of security was developed to allow older applications to execute properly.
After selecting the "permissions compatibility" mode during the installation of Terminal Services you can change it at any time via the Terminal Services Configuration MMC snap-in (Administrative Tools | Terminal Services Configuration | Server Settings | Permissions Compatibility). Setting this compatibility affects the following registry key:
Key: HKLM\System\CurrentControlSet\Control\Terminal Server\
Value: TSUserEnabled
Type: REG_DWORD
Data: 1 = Relaxed permissions. 0 = Full Security mode.
Do Not Install Terminal Services on a Domain Controller
Individual domain controllers cannot be managed separately from each other. In order for a user to be able to log on to Terminal Server sessions she must have "log on locally" (called "log on interactively" in Windows 2000) rights. If the Terminal Server is a domain controller, granting the user "log on locally" rights on the server will allow her to log on to any domain controller, even ones that are not Terminal Servers.
Also, domain controllers in Active Directory environments must be located in the "Domain Controllers" OU. You can't use OU-based Group Policy Objects if your Terminal Servers are installed on domain controllers.
Disable the "Secondary Logon" Service
Windows 2000 introduced a secondary logon ability (then called the "Run As" service) which allows users to run programs with different user rights. Within Windows Explorer, a user can shift-right-click on a file and select "Run as..." from the context menu. Alternately, a user can enter the "runas" command into the command line.
Administrators often lock down Terminal Servers for those groups of users that should be using them. The secondary logon ability allows a user who's already connected to a Terminal Server to change his credentials, potentially bypassing any security measures the administrator has configured. (If you read the rest of this chapter, you'll know better than to build servers that exhibit this weakness.)
The secondary logon ability can be disabled at the server by stopping and disabling the "Secondary Logon" service. Disable the service after you stop it, or the system will start it again when it is needed.
Remove all Non-Essential Software
Any extra applications installed on your Terminal Servers represent an increased security risk. Each installed application brings introduces more vulnerabilities. Access to extra tools, (such as those included in the resource kits) makes compromising or abusing the server easier. You shouldn't give your users more than they need to do their job.
* Using the NTFS file system.
* Configuring NTFS file permissions.
* Using GPOs to secure the user environment.
* Installing Terminal Services on a domain controller.
* Disabling the "Secondary Logon" Service.
* Remove unnecessary software
* Applying hotfixes and service packs.
Use the NTFS File System
Each user that runs a session on a Terminal Server is essentially running a remote control console session. Without an NTFS file system, you won't be able to set any file-level security permissions. Any user that is logged would be able to access files in use by other users. No mechanism would prevent users from deleting key system files, potentially crashing the server!
There is no reason not to use NTFS on your servers. Every user will be able to access NTFS files via an RDP session, even if his client is running on an operating system that cannot support NTFS, such as Windows 95.
Configure NTFS File Permissions
Using just the NTFS file system might not provide enough security with its default permissions in your environment. Even if you do not intend to fully lock-down your Terminal Servers or plan to run only initial applications, you should secure the basic file system.
When you install Terminal Services on a Windows 2003 server, you're asked whether you want to use "Full Security" or "Relaxed Security." This security setting has nothing to do with your domain configuration or your Active Directory environment. It affects only the level of security that users are given when they access your server via a Terminal Services session. To compare the two settings:
* Full Security. This setting results in Terminal Services users having the same permissions as regular members of the local users group. Regular users are not able to write to inappropriate registry keys or tamper with sensitive system files. Of course, with this level of security comes additional risk. In this case, users will sometimes not be able to run legacy applications. If you choose Full Security, you should thoroughly test your applications before enabling them for any users.
* Relaxed Security This setting results in Terminal Services users having full access to many parts of the registry and many of the system files. This alternate level of security was developed to allow older applications to execute properly.
After selecting the "permissions compatibility" mode during the installation of Terminal Services you can change it at any time via the Terminal Services Configuration MMC snap-in (Administrative Tools | Terminal Services Configuration | Server Settings | Permissions Compatibility). Setting this compatibility affects the following registry key:
Key: HKLM\System\CurrentControlSet\Control\Terminal Server\
Value: TSUserEnabled
Type: REG_DWORD
Data: 1 = Relaxed permissions. 0 = Full Security mode.
Do Not Install Terminal Services on a Domain Controller
Individual domain controllers cannot be managed separately from each other. In order for a user to be able to log on to Terminal Server sessions she must have "log on locally" (called "log on interactively" in Windows 2000) rights. If the Terminal Server is a domain controller, granting the user "log on locally" rights on the server will allow her to log on to any domain controller, even ones that are not Terminal Servers.
Also, domain controllers in Active Directory environments must be located in the "Domain Controllers" OU. You can't use OU-based Group Policy Objects if your Terminal Servers are installed on domain controllers.
Disable the "Secondary Logon" Service
Windows 2000 introduced a secondary logon ability (then called the "Run As" service) which allows users to run programs with different user rights. Within Windows Explorer, a user can shift-right-click on a file and select "Run as..." from the context menu. Alternately, a user can enter the "runas" command into the command line.
Administrators often lock down Terminal Servers for those groups of users that should be using them. The secondary logon ability allows a user who's already connected to a Terminal Server to change his credentials, potentially bypassing any security measures the administrator has configured. (If you read the rest of this chapter, you'll know better than to build servers that exhibit this weakness.)
The secondary logon ability can be disabled at the server by stopping and disabling the "Secondary Logon" service. Disable the service after you stop it, or the system will start it again when it is needed.
Remove all Non-Essential Software
Any extra applications installed on your Terminal Servers represent an increased security risk. Each installed application brings introduces more vulnerabilities. Access to extra tools, (such as those included in the resource kits) makes compromising or abusing the server easier. You shouldn't give your users more than they need to do their job.
Source: http://www.brianmadden.com/blogs/terminal_services_for_microsoft_windows_server_2003_advanced_technical_design_guide/pages/server-security.aspx
Thursday, April 16, 2009
Importance of Server Licenses in Windows 2003 Server
After the installation has been done various things might have been missed which cannot be reverted later. One of them is the Licenses to the users managing windows 2003 server. We hardly would make sure that we have selected the right option but later after this arises as a problem we would have to consult server support.
The licensing can be selected for two modes.
1 Per Server Number of concurrent sessions.
2 Per device or per user.
If the licenses have been issued to number of users per server which would mean that at a time those many concurrent sessions would be established to a server. E.g. if you have selected 10 users that means the users who are members of the terminal services group can establish only 10 sessions at a time. Now when it comes to the user licenses it means only no of users have been given right to manage the servers.
If you have already selected the no of licenses per server which means at a single point of time that many concurrent sessions would be established to your server. So in this your partner system administrator responsible for server management or DNS support engineer manage your server you would not need any specific license for him.
The licenses can also be purchased from different vendors like VeriSign. You can also give a go through to the partners to purchase licenses for managing servers. Even if their server support engineer would initiate a server managing session to your server they can purchase the required licenses. So next time you start the installation make sure take care of all things should be taken into consideration.
For Full detail Visit here
Subscribe to:
Posts (Atom)

